Total Pageviews

Monday, September 14, 2020

Public Endpoint for Azure Managed Instance and SSMS connectivity

VPN throughput or intermittent connection disruption could be an issue while connecting to an Azure Managed Instance. To avoid VPN connection-related disruptions to an Azure Managed Instance,  Microsoft has introduced Public Endpoint Link to connect an Azure managed instance directly from an on-premises SSMS. Public Endpoint is also helpful while managing both on-premises SQL Servers as well as Cloud based Azure SQL offerings through SSMS.

Steps to follow: (using PowerShell or using Azure Portal)

  • Enable Public Endpoint for the managed instance.
  • Configure the managed instance Network Security Group (NSG).
  • Obtain the managed instance Public Endpoint host name.

Managed Instance Note:

  • The value for the priority of the “Inbound Traffic Rule” must be higher than the “deny_all_inbound” rule.
  • The default port of the managed instance is 3342, it is fixed and can’t be changed.
  • To connect from an on-premises SSMS, use the following host naming method:

<mi_name>.public.<dns_zone>.database.windows.net,3342    

In our example, the managed instance host name is the following:

shb-mi-01.public.aaf67be1d0fe.database.windows.net,3342

Using PowerShell:

# Connect to the Azure Cloud
Connect-AzAccount

# Initiate Resource groups where managed instance belongs to
$rgname ='shb-db-rg-01'
# Managed instance name
$miname = 'shb-mi-01' 

# Enable the public endpoint
$misql = Get-AzSqlInstance -ResourceGroupName $rgname -Name $miname
$misql = $misql | Set-AzSqlInstance -PublicDataEndpointEnabled $true -force

# Modify NSG (Network security Group) by adding Inbound security rule
Get-AzNetworkSecurityGroup -Name nsg-shb-mi-01 -ResourceGroupName shb-db-rg-01 | `
    Add-AzNetworkSecurityRuleConfig -Name public_endpoint_inbound_sql -Description "Allow SQL TCP" -Access Allow `
    -Protocol Tcp -Direction Inbound -Priority 1210 -SourceAddressPrefix * -SourcePortRange * `
    -DestinationAddressPrefix * -DestinationPortRange 3342 | Set-AzNetworkSecurityGroup

 Inbound Traffic:


Connection to an Managed Instance:


References:

Sunday, August 30, 2020

VMXNET3 Configuration and High ASYNC_NETWORK_IO Waittype on a SQL Server

It is not uncommon to see network performance degradation on a ESX guest when a high number of connections occur, or the workload is increased. One might observe high network latency, network packet loss, high CPU usage and/or application time-out issues.  From SQL Server, the issue can be detected by observing a high number of ASYNC_NETWORK_IO waittype. Although there are no problems with the SQL Server configuration, a developer or the application engineering team indicates a network related issue, others may conclude that the root cause is bad application design and coding practice.

While the application code may have some fault, it could also be the VMXNET3 drive configuration on the VMWare guest that needs to be tweaked.

Performance Issues from VMXNET3:

The VMWare VMXNET3 is an enhanced and feature rich network driver, however it can be problematic if the driver is not optimally configured. Following are a few performance issues worth noting:

  • Network packet loss
  • High network latency (slow data transfer)
  • High CPU usage on the guest
  • Disconnection of client applications
  • Unexpected cluster failover when nodes are built on Virtual Machines

SQL Server Symptoms:

Following are some symptoms from SQL Server’s side:

  • Long running queries
  • Excessive ASYNC_NETWORK_IO waittype
  • Query time-out
  • High CPU usage or CPU Spike

Recommendations for VMXNET3:

It is highly recommended to adjust the VMXNET3 network driver configuration on the guest system to improve network performance. The configuration changes on VMXNET3 is for all Windows based guest Operating Systems, regardless of whether a guest system experiences issues or not. Following are a few recommended changes that need to be considered and adjusted:   

  • Small Rx Buffers: Increase the value to its maximum, which is 8192.
  • Rx Ring #1 Size: Increase the value to its maximum, which is 4096.
  • Receive-side scaling (RSS): Enable RSS on the VMXNET network adapter.
  • Chimney Offload state: Disable this option if it is not already disabled.
  • Power Plan: Make sure that the High performance option is selected in the power plan (run powercfg.cpl).
  • Speed & Duplex: Make sure that Auto-Negotiation of the VMXNET3 is detecting the network bandwidth properly.

Receive Side Scaling (RSS):

This network driver configuration within Windows Server enables distribution of the kernel-mode network processing load across multiple CPUs. If it is disabled, then all network processing will be handled by a single CPU core and could lead to network bottleneck. 

By default, Windows uses up to 4 CPUs for RSS and the maximum RSS value is 16. However, the value should not exceed the total number of cores recorded on a Windows Server.

Configuring a VMXNET3:  

On a VMWare guest, use the following command to check the status:  

################################################
# get VMXNET3 information
################################################
Get-NetAdapter | Where-Object { $_.InterfaceDescription -like 'VMXNET3*' } |`
 Get-NetAdapterAdvancedProperty |`
   Format-Table -AutoSize

 Output from the above script:

Querying TCP status:


To reconfigure the VMXNET3, we can use the following PowerShell Script for the targeted NIC Adapter. Please note that this will cause a NIC disconnection during the Restart-NetAdapter call, and will interrupt the network connection on the adapter for several seconds. 

PowerShell Script: 

################################################
# Enable RSS globaly and disable Chimney Offload
################################################
Set-NetOffloadGlobalSetting -ReceiveSideScaling Enabled
Set-NetOffloadGlobalSetting -Chimney Disabled

################################################
# get VMXNET3 information
################################################
Get-NetAdapter | Where-Object { $_.InterfaceDescription -like 'VMXNET3*' } |`
 Get-NetAdapterAdvancedProperty |`
   Format-Table -AutoSize

################################################
# Reconfigure VMXNET3 settings
################################################
# Receive Side Scaling
Get-NetAdapter | Where-Object { $_.InterfaceDescription -like 'VMXNET3*' } |`
 Set-NetAdapterAdvancedProperty -DisplayName 'Receive Side Scaling' -DisplayValue 'Enabled' -NoRestart
# Receive Throttle
Get-NetAdapter | Where-Object { $_.InterfaceDescription -like 'VMXNET3*' } |`
 Set-NetAdapterAdvancedProperty -DisplayName 'Receive Throttle' -DisplayValue '30' -NoRestart

# Small Rx Buffers
Get-NetAdapter | Where-Object { $_.InterfaceDescription -like 'VMXNET3*' } |`
 Set-NetAdapterAdvancedProperty -DisplayName 'Small Rx Buffers' -DisplayValue '8192' -NoRestart

# Rx Ring #1 Size
Get-NetAdapter | Where-Object { $_.InterfaceDescription -like 'VMXNET3*' } |`
 Set-NetAdapterAdvancedProperty -DisplayName 'Rx Ring #1 Size' -DisplayValue '4096' -NoRestart
<#Get-NetAdapter | Where-Object { $_.InterfaceDescription -like 'VMXNET3*' } |`
 Set-NetAdapterAdvancedProperty -RegistryKeyword 'MaxRxRing1Length' -DisplayValue '4096' -NoRestart #>

# Rx Ring #2 Size
Get-NetAdapter | Where-Object { $_.InterfaceDescription -like 'VMXNET3*' } |`
 Set-NetAdapterAdvancedProperty -DisplayName 'Rx Ring #2 Size' -DisplayValue '4096' -NoRestart
<#Get-NetAdapter | Where-Object { $_.InterfaceDescription -like 'VMXNET3*' } |`
 Set-NetAdapterAdvancedProperty -RegistryKeyword 'MaxRxRing2Length' -DisplayValue '4096' -NoRestart #>

# Large Rx Buffers
Get-NetAdapter | Where-Object { $_.InterfaceDescription -like 'VMXNET3*' } |`
 Set-NetAdapterAdvancedProperty -DisplayName 'Large Rx Buffers' -DisplayValue '8192' -NoRestart

# Speed & Duplex
Get-NetAdapter | Where-Object { $_.InterfaceDescription -like 'VMXNET3*' } |`
 Set-NetAdapterAdvancedProperty -DisplayName 'Speed & Duplex' -DisplayValue '10 Gbps Full Duplex' -NoRestart

# Restart the VMXNET3
Get-NetAdapter | Where-Object { $_.InterfaceDescription -like 'VMXNET3*' } |`
 Restart-NetAdapter 

################################################
# To reset VMXNET3 settings to default 
################################################
Get-NetAdapter | Where-Object { $_.InterfaceDescription -like 'VMXNET3*' } |`
  Reset-NetAdapterAdvancedProperty -DisplayName '*'

  Reconfiguration of VMXNET3:

VMXNET3 Properties:


Windows Power Plan:


Conclusion: Applying best practices around VMXNET3 will definitely help to improve overall performance, but any performance issues related to the application will not be completely eliminated. The optimization efforts towards the application code will dramatically reduce network related performance problems, and hence the reduction of the waittype ASYNC_NETWORK_IO.

References and further reading:


Thursday, August 27, 2020

Azure Automation, RunBooks and T-SQL Query output directly to Azure Blob Storage

We often perform tasks to export data using custom T-SQL queries against a SQL Server (either in cloud or on-premises) and store it on a local/network shared drive/Cloud Storage for the data analytics team or for other purposes. The data export process can either be done manually or using an automated scripting process, and in a variety of ways using SQL Agent job, PowerShell with Windows Task or a third-party tool.

When we are in the Microsoft Azure Cloud, it is a good idea to choose a capable automation technique. Azure Automation is the best option and can be considered for all automation needs who loves PowerShell scripting language.

Now let’s say there is a requirement to extract data from Azure SQL (either SaaS, PaaS or IaaS environment) and store it in CSV format on a regular basis. As the SaaS offering (Azure SQL Database) does not support SQL Server Agent, Azure Automation using PowerShell is the most efficient way to perform this task. We can easily leverage all of our existing code with only some minor tweaking required.

Azure Automation - PowerShell:
For this example, we have an Azure SQL server “shb-srv-db-01.database.windows.net” and a database “WorkForceDB”. We need to extract data from this database using one or more T-SQL queries every night and dump the data directly into an Azure blob storage. Following are some required steps to create an Azure Automation Runbook:
  1. Create an Azure Automation Account.
  2. Create Runbook, specify PowerShell as scripting language.
  3. Add the PowerShell Script.
  4. Publish the Runbook.
  5. Create and configure a Schedule.
  6. Link the schedule to the Runbook.

How does the PowerShell Script work?
This PowerShell Script can be run on-premises as well as in Azure Cloud. In both cases we need to import the Az.Storage module. We can execute this script manually in PowerShell ISE/VS Code as well as using Windows Task Scheduler:

  1. Connects to a SQL Server.
  2. Execute one or more queries.
  3. Stage the output in $Env:temp location.
  4. Connect to the Azure Storage Account
  5. Copy the CSV file to the blob storage.

PowerShell Script:

#Variable declaration

# Connect to an on-premise SQL Server 
# $SQLServer = "tcp:SHBMAIN\SQL2019,52225"  

# Connect to Cloud based SQL Server
$SQLServer = "tcp:shb-srv-db-01.database.windows.net,1433"  

$DatabaseName = "WorkForceDB"  
$UserName ="sqladmin"  
$Password = "Winter20"   
$delimiter = ","

# fine name and staging area to told query output
$FileName1 = $env:temp +"/AzureQueryOutput1_$(get-date -f yyyyMMdd-hhmmtt).csv"
# second file name of the second query output
$FileName2 = $env:temp +"/AzureQueryOutput2_$(get-date -f yyyyMMdd-hhmmtt).csv"

# SQL Query and connection to the database server
$SqlQuery = "SELECT * FROM dbo.tbl01;SELECT * FROM dbo.tbl02;"  
$SqlConnection = New-Object System.Data.SqlClient.SqlConnection  
$SqlConnection.ConnectionString = "Server=$SQLServer;Database=$DatabaseName;Integrated Security=False;UID=$UserName;PWD=$Password"
$SqlConnection.Open()
  
$SqlCmd = New-Object System.Data.SqlClient.SqlCommand  
$SqlCmd.CommandText = $SqlQuery  
$SqlCmd.Connection = $SqlConnection  
$SqlAdapter = New-Object System.Data.SqlClient.SqlDataAdapter  
$SqlAdapter.SelectCommand = $SqlCmd   

#export the query result  
$DataSet = New-Object System.Data.DataSet  
$SqlAdapter.Fill($DataSet)  
$DataSet.Tables[0] | export-csv -Delimiter $delimiter -Path $FileName1 -NoTypeInformation 
$DataSet.Tables[1] | export-csv -Delimiter $delimiter -Path $FileName2 -NoTypeInformation 
$SqlConnection.Close()

# storage account information
$StorageAccountName = "storesqloutput"
$StorageAccountKey = "gMdFZwzNoB8DPGVi2cwTexqUt9gp6ET07rwEdgqrPHnc68cZz4Dmm6rasrIw7D5KSETaC7q+lF5d7RXsThUbPQ=="
$ContainerName = "sqloutput"

$Context = New-AzStorageContext -StorageAccountName $StorageAccountName -StorageAccountKey $StorageAccountKey
$Container = Get-AzStorageContainer -Container $ContainerName -Context $Context 

# export the query result to blob storage
$Container | Set-AzStorageBlobContent -File $FileName1 -BlobType Block -Force -Verbose
$Container | Set-AzStorageBlobContent -File $FileName2 -BlobType Block -Force -Verbose

# end of script

Azure RunBook:

Test run of the PowerShell RunBook:


PowerShell output to Azure Blob Storge:

Executing same script in PowerShell ISE:


Further Reading:

  1. Azure Automation: Your SQL Agent in the Cloud: https://azure.microsoft.com/is-is/blog/azure-automation-your-sql-agent-in-the-cloud/
  2. Azure Automation documentation: https://docs.microsoft.com/en-us/azure/automation/


Tuesday, August 25, 2020

Direct Migration to Azure SQL Database using SQLPackage.exe

The native and the traditional database backup of SQL Server works flawlessly almost everywhere, but when it comes to “Azure SQL Database”, the traditional backup method is absolutely useless. Well the reason for that is because “Azure SQL Database” is a less featured and streamed-down version of the original SQL Server Database Engine, as a result it does not support a number of features and functionalities. Thus the traditional and our most trusted backup method is forgotten, but alternatively, there is a tool called “SQLPackage.exe” that we can use.

So, moving from an on-premises SQL Server to Azure SQL Database requires careful planning, validation and thorough testing approach. Microsoft has provided a few tools and techniques to achieve a successful migration.

Migrating from on-premises SQL Server might be challenging as some of the SQL Server features are not available. Every unsupported feature needs to be removed or adjusted before the final move to make sure that the migrated database is fully compatible with the SaaS offering of SQL Server in the Azure cloud.

Microsoft offers three different database engine platforms in the Azure cloud:

1.   SaaS: Azure SQL Database: It is a serverless computing database and supports most on-premises database-level capabilities. Database size can be up to 100TB.

2.   PaaS: Azure SQL Managed Instance: It supports almost all on-premises instance-level and database-level capabilities. Database size can be up to 8TB.

3.   IaaS: SQL Server on Azure VM: Similar to on-premises SQL Server instance and supports all on-premises capabilities. The SQL Server instances can be allocated up to 256 TB of storage.

From the above, the Azure SQL Database offering is one of the most popular choices. It is the right choice for applications that do not use a number of SQL Server Engine features.

Microsoft Data Migration Assistant: This is one of the most critical tools that detects partially supported or unsupported features that are currently in use at the source SQL Server. It provides recommendations, alternative approaches available in Azure and mitigating steps so that the database migration journey can be planned ahead.

SQLPackage.exe: This is a handy and feature-rich command line tool that can be used to migrate on-premises SQL Server databases, especially when migrating to the Azure SQL Database (SaaS). This tool also can be used to identify all incompatibilities and unsupported features quickly.

Migrating to Azure SQL Database: Let’s say we need to migrate a database named “WorkForceDB” from our on-premises server (SHBMAIN\SQL2019). The Data Migration Assistant (DMA) or SSDT or some other method has already been used to address all incompatibilities. Now the database is finally ready to start its journey to the Azure Cloud.

Step-by-Step:

In this migration process, we will be using SQLPackage.exe and PowerShell to perform all tasks. The following information is necessary:

  1. An Azure SQL Database Server – We need an Azure subscription.
  2. SQLPackage.exe – download and install, if it is not done yet.
  3. PowerShell – Preferably version 5.1 or above.
First let’s create an Azure SQL Database Server:
  1. Login to Azure Portal.
  2. Select “Create a resource”.
  3. Search for the Azure SQL and then select “Create”.
  4. Select “Database Server” from the drop down list and select “Create “.
  5. In my example, I have created the server named “shb-srv-db-01”.
  6. Once the server creation is complete, open the newly created resource “shb-srv-db-01“and click the “Firewalls and virtual networks”. Add the Client IP to the firewall.
  7. Note the database server URL, server admin and password.
  8. If you don’t have “SQLPackage.exe“ on your server/desktop, then download and install it.
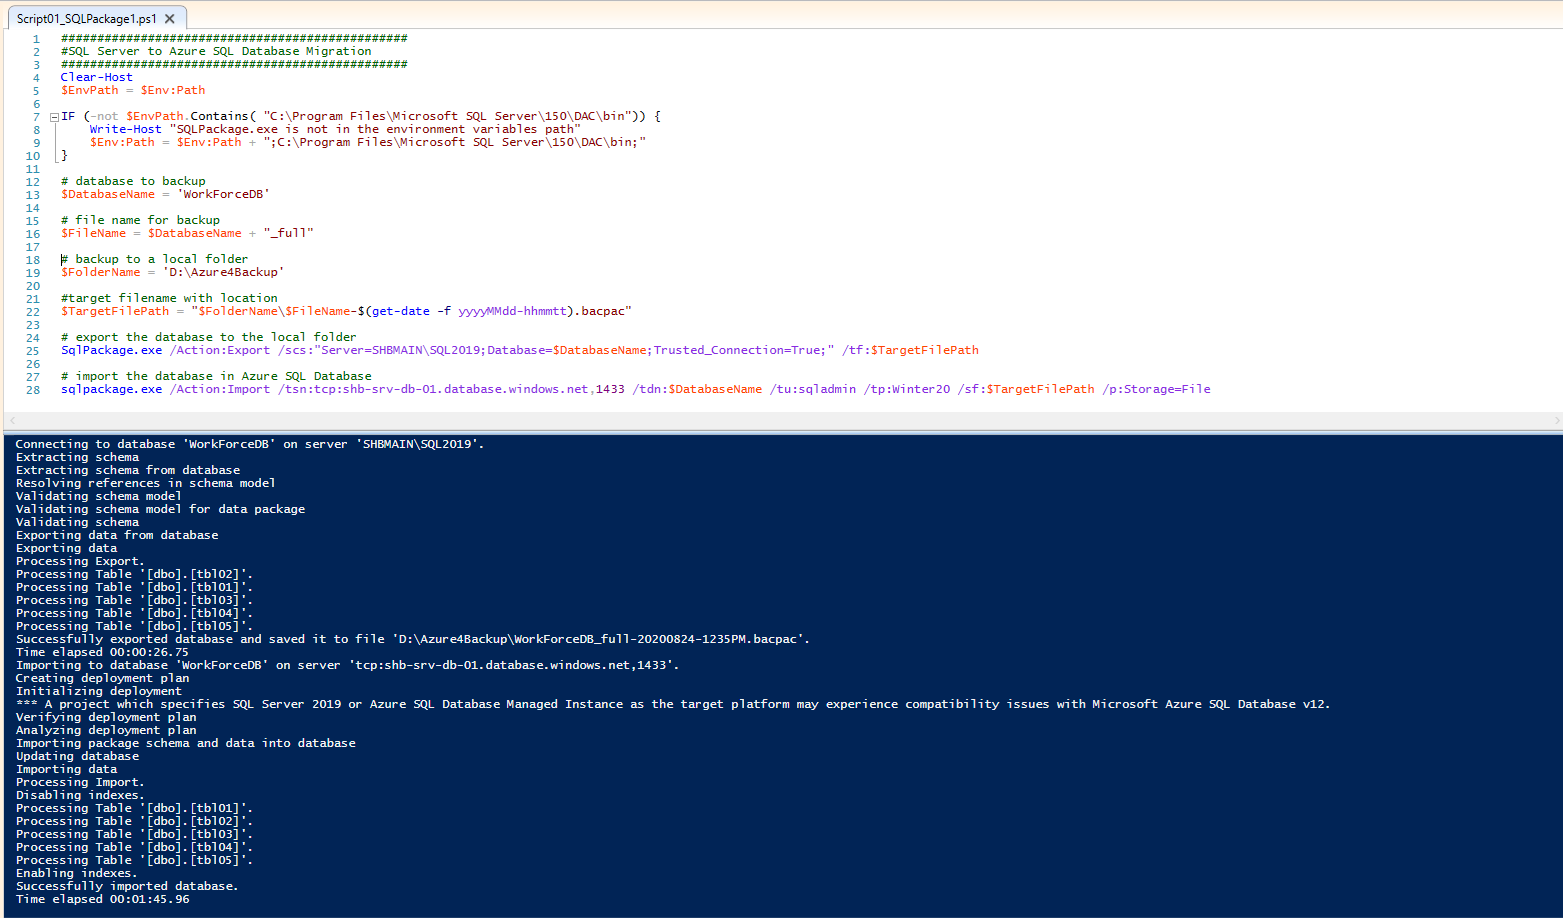
  9. Review and execute the following PowerShell script. The script does the following:
    >Sets the environmental variable for the SQLPackage.exe.
    >Generates the database bacpac file name.
    >Backs up the database from the SQL Server SHBMAIN\SQL2019.
    >Restores the bacpac file to shb-srv-db-01 directly.
  10. During the restoration process, if we do not include Azure Database Service Tier, then the restore will automatically create Gen5 General Purpose with 2 vCore pricing Tier. Note that this Service Tier can be changed once the database is restored and becomes available. 
  11. Connect and review the database migration status either using the Azure Portal, as well as using SSMS.

Creating an Azure SQL Database Server:


Firewall Setup for Client IP:


Reviwing Mirated Database using SSMS:

Migrated Database in Azure Portal:


Database Migration Script: 

Clear-Host
$EnvPath = $Env:Path
 
IF (-not $EnvPath.Contains( "C:\Program Files\Microsoft SQL Server\150\DAC\bin")) {
    Write-Host "SQLPackage.exe is not in the environment variables path"
    $Env:Path = $Env:Path + ";C:\Program Files\Microsoft SQL Server\150\DAC\bin;"
}

# database to backup
$DatabaseName = 'WorkForceDB'

# file name for backup
$FileName = $DatabaseName + "_full"

# backup to a local folder
$FolderName = 'D:\Azure4Backup'

#target filename with location
$TargetFilePath = "$FolderName\$FileName-$(get-date -f yyyyMMdd-hhmmtt).bacpac"

# export the database to the local folder
SqlPackage.exe /Action:Export /scs:"Server=SHBMAIN\SQL2019;Database=$DatabaseName;Trusted_Connection=True;" /tf:$TargetFilePath

# import the database in Azure SQL Database
sqlpackage.exe /Action:Import /tsn:tcp:shb-srv-db-01.database.windows.net,1433 /tdn:$DatabaseName /tu:sqladmin /tp:Winter20 /sf:$TargetFilePath /p:Storage=File

Using PowerShell and SQLPackage.exe 


References: