The native and the traditional database backup of SQL Server works flawlessly almost everywhere, but when it comes to “Azure SQL Database”, the traditional backup method is absolutely useless. Well the reason for that is because “Azure SQL Database” is a less featured and streamed-down version of the original SQL Server Database Engine, as a result it does not support a number of features and functionalities. Thus the traditional and our most trusted backup method is forgotten, but alternatively, there is a tool called “SQLPackage.exe” that we can use.
So, moving from an on-premises SQL Server to Azure SQL Database requires careful planning, validation and thorough testing approach. Microsoft has provided a few tools and techniques to achieve a successful migration.
Migrating from on-premises SQL Server might be challenging as some of the SQL Server features are not available. Every unsupported feature needs to be removed or adjusted before the final move to make sure that the migrated database is fully compatible with the SaaS offering of SQL Server in the Azure cloud.
Microsoft offers three different database engine platforms in the Azure cloud:
1. SaaS: Azure SQL Database: It is a serverless computing database and supports most on-premises database-level capabilities. Database size can be up to 100TB.
2. PaaS: Azure SQL Managed Instance: It supports almost all on-premises instance-level and database-level capabilities. Database size can be up to 8TB.
3. IaaS: SQL Server on Azure VM: Similar to on-premises SQL Server instance and supports all on-premises capabilities. The SQL Server instances can be allocated up to 256 TB of storage.
From the above, the Azure SQL Database offering is one of the most popular choices. It is the right choice for applications that do not use a number of SQL Server Engine features.
Microsoft Data Migration Assistant: This is one of the most critical tools that detects partially supported or unsupported features that are currently in use at the source SQL Server. It provides recommendations, alternative approaches available in Azure and mitigating steps so that the database migration journey can be planned ahead.
SQLPackage.exe: This is a handy and feature-rich command line tool that can be used to migrate on-premises SQL Server databases, especially when migrating to the Azure SQL Database (SaaS). This tool also can be used to identify all incompatibilities and unsupported features quickly.
Migrating to Azure SQL Database: Let’s say we need to migrate a database named “WorkForceDB” from our on-premises server (SHBMAIN\SQL2019). The Data Migration Assistant (DMA) or SSDT or some other method has already been used to address all incompatibilities. Now the database is finally ready to start its journey to the Azure Cloud.
Step-by-Step:
In this migration process, we will be using SQLPackage.exe and PowerShell to perform all tasks. The following information is necessary:
- An Azure SQL Database Server – We need an Azure subscription.
- SQLPackage.exe – download and install, if it is not done yet.
- PowerShell – Preferably version 5.1 or above.
- Login to Azure Portal.
- Select “Create a resource”.
- Search for the Azure SQL and then select “Create”.
- Select “Database Server” from the drop down list and select “Create “.
- In my example, I have created the server named “shb-srv-db-01”.
- Once the server creation is complete, open the newly created resource “shb-srv-db-01“and click the “Firewalls and virtual networks”. Add the Client IP to the firewall.
- Note the database server URL, server admin and password.
- If you don’t have “SQLPackage.exe“ on your server/desktop, then download and install it.
- Review and execute
the following PowerShell script. The script does the following:>Sets the environmental variable for the SQLPackage.exe.
>Generates the database bacpac file name.
>Backs up the database from the SQL Server SHBMAIN\SQL2019.
>Restores the bacpac file to shb-srv-db-01 directly. - During the restoration process, if we do not include Azure Database Service Tier, then the restore will automatically create Gen5 General Purpose with 2 vCore pricing Tier. Note that this Service Tier can be changed once the database is restored and becomes available.
- Connect and review the database migration status either using the Azure Portal, as well as using SSMS.
Creating an Azure SQL Database Server:

Firewall Setup for Client IP: 
Reviwing Mirated Database using SSMS:

Migrated Database in Azure Portal:
:
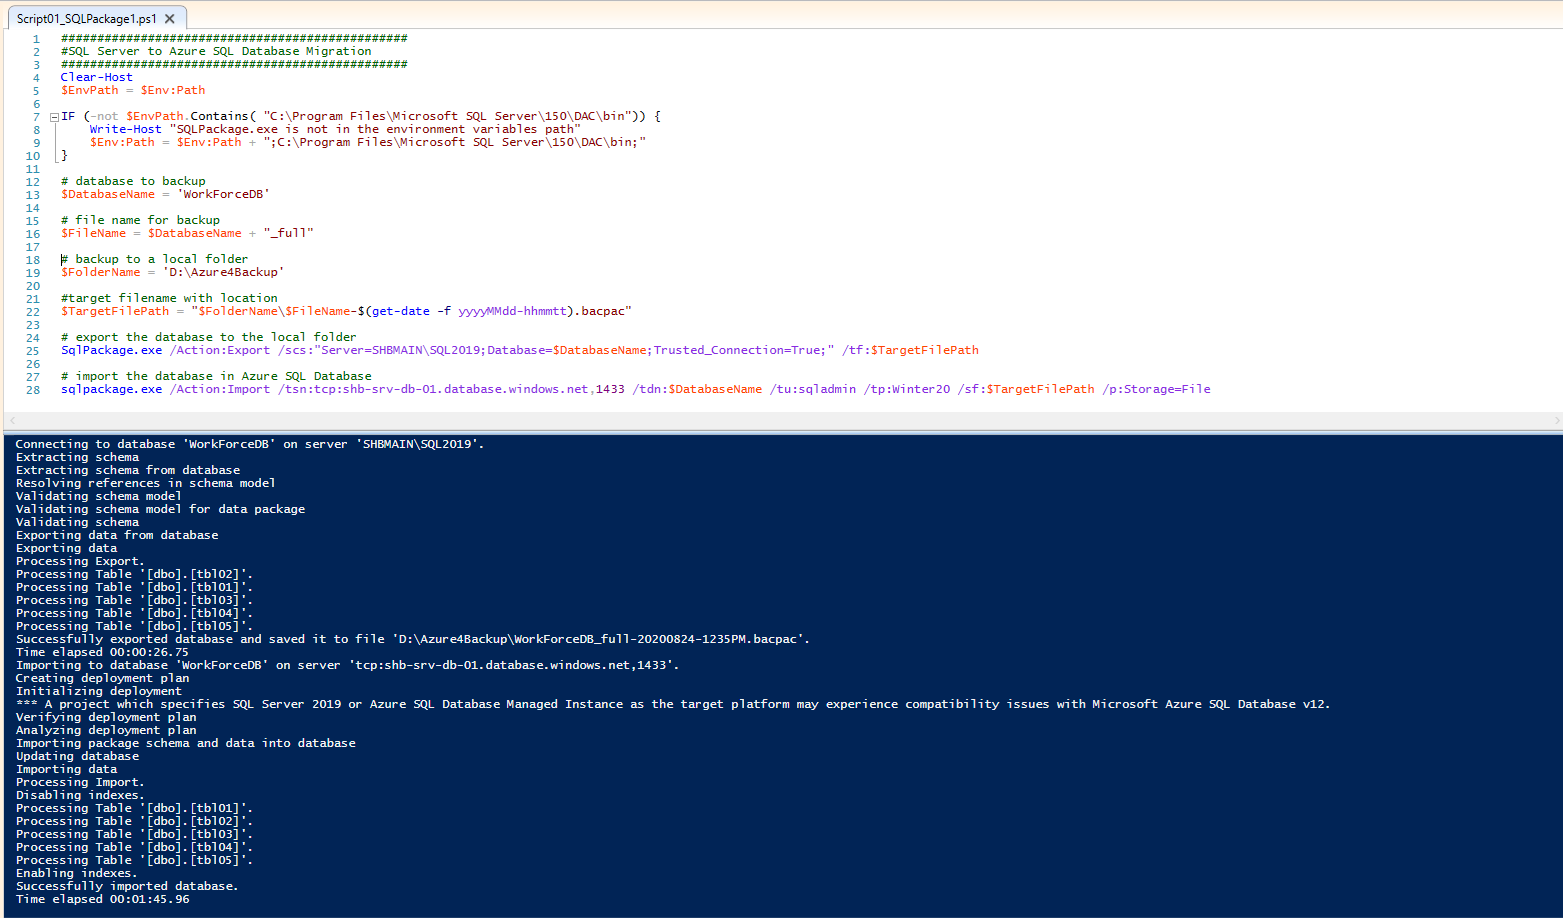
Database Migration Script:
Clear-Host
$EnvPath = $Env:Path
IF (-not $EnvPath.Contains( "C:\Program Files\Microsoft SQL Server\150\DAC\bin")) {
Write-Host "SQLPackage.exe is not in the environment variables path"
$Env:Path = $Env:Path + ";C:\Program Files\Microsoft SQL Server\150\DAC\bin;"
}
# database to backup
$DatabaseName = 'WorkForceDB'
# file name for backup
$FileName = $DatabaseName + "_full"
# backup to a local folder
$FolderName = 'D:\Azure4Backup'
#target filename with location
$TargetFilePath = "$FolderName\$FileName-$(get-date -f yyyyMMdd-hhmmtt).bacpac"
# export the database to the local folder
SqlPackage.exe /Action:Export /scs:"Server=SHBMAIN\SQL2019;Database=$DatabaseName;Trusted_Connection=True;" /tf:$TargetFilePath
# import the database in Azure SQL Database
sqlpackage.exe /Action:Import /tsn:tcp:shb-srv-db-01.database.windows.net,1433 /tdn:$DatabaseName /tu:sqladmin /tp:Winter20 /sf:$TargetFilePath /p:Storage=File
Using PowerShell and SQLPackage.exe
References:
- Migrating from SQL Server to Azure SQL Database using Bacpac Files: https://docs.microsoft.com/en-ca/archive/blogs/sqlcat/migrating-from-sql-server-to-azure-sql-database-using-bacpac-files
- Export to a BACPAC file - Azure SQL Database and Azure SQL Managed Instance: https://docs.microsoft.com/en-us/azure/azure-sql/database/database-export
- Using SQLPackage to import or export SQL Server and Azure SQL DB: https://techcommunity.microsoft.com/t5/azure-database-support-blog/using-sqlpackage-to-import-or-export-sql-server-and-azure-sql-db/ba-p/368861
- SqlPackage.exe: https://docs.microsoft.com/en-ca/sql/tools/sqlpackage?redirectedfrom=MSDN&view=sql-server-ver15
No comments:
Post a Comment