Total Pageviews

Showing posts with label Network. Show all posts

Saturday, August 5, 2023

Paravirtualized Network Adaptor: Changing E1000e to VMXNET3:

A very common and misleading practice made by many is to accept the default value during installation or configuration. This practice may be acceptable or even suitable in some scenarios, but it may not be optimal for a targeted workload since the default values can eventually cause widespread performance issues.

While creating a Virtual Machine in vSphere ESXi, there are many mandatory values come as default for CPU, Memory, Network Card, Socket, I/O controller and so on that need to be decided on. The VMware architect sets most of the required hardware resources at the bare minimum values necessary to create a Virtual Machine regardless of the guest OS. Should we accept these defaults? Probably not. However, many administrators and associates continue to accept these bare minimum hardware default values without realizing the performance consequences.

Network Adaptor: Currently there are three types of Network Adaptors available and the E1000e is the default. E1000e is an emulated version of the “Intel 82574 Gigabit Ethernet NIC” and the guest OS will recognize it as “Intel(R) 82574L Gigabit Network Connection”. If this adaptor is selected for the guest OS (Windows, Linux), the required driver for this adaptor is already built-in within the OS and has no interaction with VMWare Tools driver.

A few disadvantages of E1000e:

1.     It is not Paravirtualized, thus VM performance is not guaranteed.

2.     Only supports basic network connectivity.

3.     Does not support RSS (Receive Side Scaling).

4.     Uses far more CPU on the hypervisor.

5.     May cause memory leakage and high CPU on the guest OS.

6.     Network packets drop.

VMXNET3: It is a Paravirtualized Network Adaptor developed by VMWare and it is recommended for VM to gain substantial performance benefit from the Virtual Machine. To take advantage of this adaptor, VMWare Tools need to be installed on the Virtual Machine.

Changing E1000e to VMXNET3: There are several ways to change the Network Adaptor type from E1000e to VMXNET3. Before doing this, you should record all network configurations from the existing network adaptor. If you would like to keep the MAC address of the of E1000e (existing network card), please write it down beforehand.

I found that using PowerCLI is the easiest and safest way to change the network adaptor type from E100e to VMXNET3.

Method 1: Using PowerCLI to change NIC type while preserving the original MAC address of E1000e:

·       Note down the network configuration, including values such as IP, subnet, Gateway, DNS, etc. and take a snapshot of the VM.

·       Turn off the VM.

·       Connect to the Esxi Server, my Esxi server IP is 192.168.0.22:

 Connect-VIServer -Server 192.168.0.22

·       Check the Network Type:

Get-VM win01| get-networkadapter

·       Change the NIC type from E1000e to VMXNET3:

get-vm win01 | Get-NetworkAdapter | set-networkadapter -type vmxnet3 -confirm:$false

·       Turn on the VM.

·       In a Windows VM, open the device manager (devmgmt.msc) and enable “Show hidden devices” under the view menu.

·       Uninstall the “Intel(R) 82574L Gigabit Network Connection”.

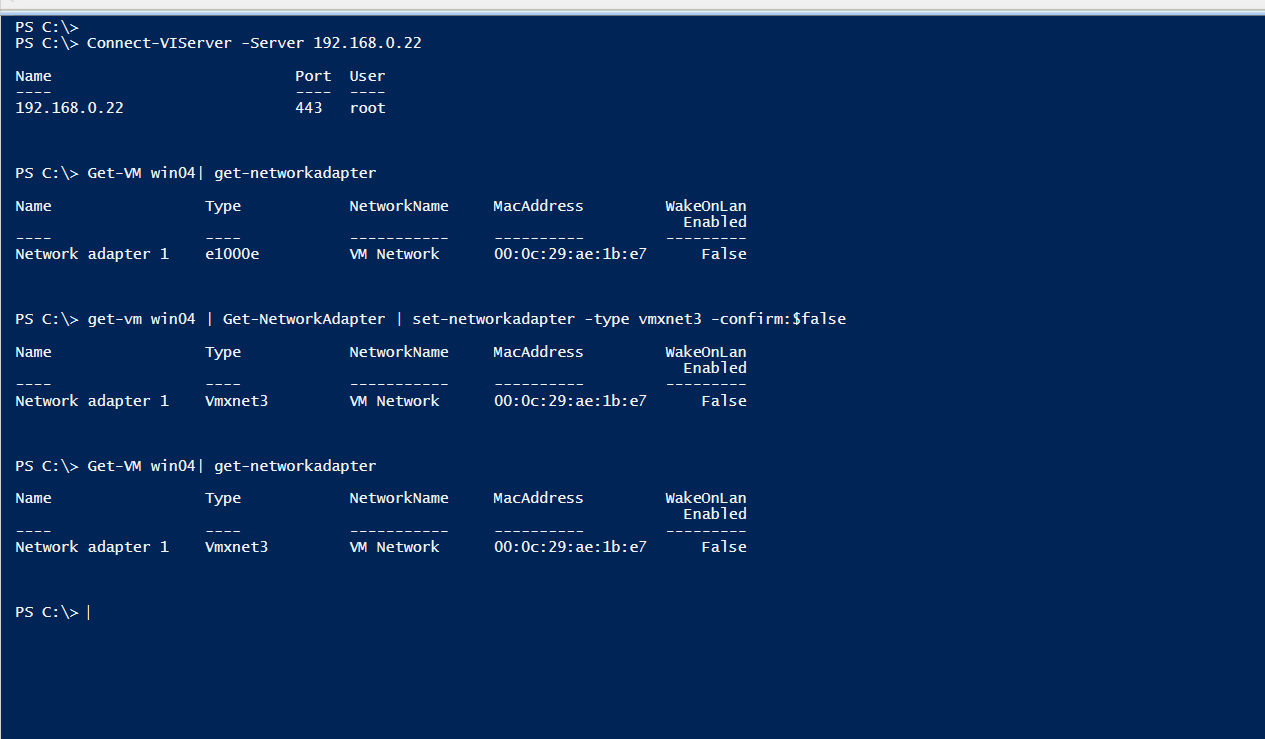
Using PowerCLI to change Network Adaptor:


Method 2: By editing the vmx file:

·       Similar to above, note down the network configuration details.

·       Take a snapshot of the VM.

·       Turn off the VM.

·       Open the datastore where the VM resides.

·       Right click and download the vmx file to local desktop.

·       Edit the vmx file and replace the adaptor type to vmxnext3 as follows: 

ethernet0.virtualDev = "vmxnet3"

·       Add the following:

ethernet0.CheckMACAddress = "FALSE"

·       Save the vmx file, then upload the edited version and replace the original version.

·       Turn on the VM.

·       In a Windows VM, open the device manager (devmgmt.msc) and enable “Show hidden devices” under the view menu.

  • Uninstall the “Intel(R) 82574L Gigabit Network Connection”.

Reference:

Choosing a network adapter for your virtual machine (1001805):

https://kb.vmware.com/s/article/1001805

Understanding full virtualization, paravirtualization, and hardware assist:
https://www.vmware.com/content/dam/digitalmarketing/vmware/en/pdf/techpaper/VMware_paravirtualization.pdf

VMXNET3 vs E1000E and E1000:

https://rickardnobel.se/vmxnet3-vs-e1000e-and-e1000-part-1/

https://rickardnobel.se/vmxnet3-vs-e1000e-and-e1000-part-2/

Sunday, August 30, 2020

VMXNET3 Configuration and High ASYNC_NETWORK_IO Waittype on a SQL Server

It is not uncommon to see network performance degradation on a ESX guest when a high number of connections occur, or the workload is increased. One might observe high network latency, network packet loss, high CPU usage and/or application time-out issues.  From SQL Server, the issue can be detected by observing a high number of ASYNC_NETWORK_IO waittype. Although there are no problems with the SQL Server configuration, a developer or the application engineering team indicates a network related issue, others may conclude that the root cause is bad application design and coding practice.

While the application code may have some fault, it could also be the VMXNET3 drive configuration on the VMWare guest that needs to be tweaked.

Performance Issues from VMXNET3:

The VMWare VMXNET3 is an enhanced and feature rich network driver, however it can be problematic if the driver is not optimally configured. Following are a few performance issues worth noting:

  • Network packet loss
  • High network latency (slow data transfer)
  • High CPU usage on the guest
  • Disconnection of client applications
  • Unexpected cluster failover when nodes are built on Virtual Machines

SQL Server Symptoms:

Following are some symptoms from SQL Server’s side:

  • Long running queries
  • Excessive ASYNC_NETWORK_IO waittype
  • Query time-out
  • High CPU usage or CPU Spike

Recommendations for VMXNET3:

It is highly recommended to adjust the VMXNET3 network driver configuration on the guest system to improve network performance. The configuration changes on VMXNET3 is for all Windows based guest Operating Systems, regardless of whether a guest system experiences issues or not. Following are a few recommended changes that need to be considered and adjusted:   

  • Small Rx Buffers: Increase the value to its maximum, which is 8192.
  • Rx Ring #1 Size: Increase the value to its maximum, which is 4096.
  • Receive-side scaling (RSS): Enable RSS on the VMXNET network adapter.
  • Chimney Offload state: Disable this option if it is not already disabled.
  • Power Plan: Make sure that the High performance option is selected in the power plan (run powercfg.cpl).
  • Speed & Duplex: Make sure that Auto-Negotiation of the VMXNET3 is detecting the network bandwidth properly.

Receive Side Scaling (RSS):

This network driver configuration within Windows Server enables distribution of the kernel-mode network processing load across multiple CPUs. If it is disabled, then all network processing will be handled by a single CPU core and could lead to network bottleneck. 

By default, Windows uses up to 4 CPUs for RSS and the maximum RSS value is 16. However, the value should not exceed the total number of cores recorded on a Windows Server.

Configuring a VMXNET3:  

On a VMWare guest, use the following command to check the status:  

################################################
# get VMXNET3 information
################################################
Get-NetAdapter | Where-Object { $_.InterfaceDescription -like 'VMXNET3*' } |`
 Get-NetAdapterAdvancedProperty |`
   Format-Table -AutoSize

 Output from the above script:

Querying TCP status:


To reconfigure the VMXNET3, we can use the following PowerShell Script for the targeted NIC Adapter. Please note that this will cause a NIC disconnection during the Restart-NetAdapter call, and will interrupt the network connection on the adapter for several seconds. 

PowerShell Script: 

################################################
# Enable RSS globaly and disable Chimney Offload
################################################
Set-NetOffloadGlobalSetting -ReceiveSideScaling Enabled
Set-NetOffloadGlobalSetting -Chimney Disabled

################################################
# get VMXNET3 information
################################################
Get-NetAdapter | Where-Object { $_.InterfaceDescription -like 'VMXNET3*' } |`
 Get-NetAdapterAdvancedProperty |`
   Format-Table -AutoSize

################################################
# Reconfigure VMXNET3 settings
################################################
# Receive Side Scaling
Get-NetAdapter | Where-Object { $_.InterfaceDescription -like 'VMXNET3*' } |`
 Set-NetAdapterAdvancedProperty -DisplayName 'Receive Side Scaling' -DisplayValue 'Enabled' -NoRestart
# Receive Throttle
Get-NetAdapter | Where-Object { $_.InterfaceDescription -like 'VMXNET3*' } |`
 Set-NetAdapterAdvancedProperty -DisplayName 'Receive Throttle' -DisplayValue '30' -NoRestart

# Small Rx Buffers
Get-NetAdapter | Where-Object { $_.InterfaceDescription -like 'VMXNET3*' } |`
 Set-NetAdapterAdvancedProperty -DisplayName 'Small Rx Buffers' -DisplayValue '8192' -NoRestart

# Rx Ring #1 Size
Get-NetAdapter | Where-Object { $_.InterfaceDescription -like 'VMXNET3*' } |`
 Set-NetAdapterAdvancedProperty -DisplayName 'Rx Ring #1 Size' -DisplayValue '4096' -NoRestart
<#Get-NetAdapter | Where-Object { $_.InterfaceDescription -like 'VMXNET3*' } |`
 Set-NetAdapterAdvancedProperty -RegistryKeyword 'MaxRxRing1Length' -DisplayValue '4096' -NoRestart #>

# Rx Ring #2 Size
Get-NetAdapter | Where-Object { $_.InterfaceDescription -like 'VMXNET3*' } |`
 Set-NetAdapterAdvancedProperty -DisplayName 'Rx Ring #2 Size' -DisplayValue '4096' -NoRestart
<#Get-NetAdapter | Where-Object { $_.InterfaceDescription -like 'VMXNET3*' } |`
 Set-NetAdapterAdvancedProperty -RegistryKeyword 'MaxRxRing2Length' -DisplayValue '4096' -NoRestart #>

# Large Rx Buffers
Get-NetAdapter | Where-Object { $_.InterfaceDescription -like 'VMXNET3*' } |`
 Set-NetAdapterAdvancedProperty -DisplayName 'Large Rx Buffers' -DisplayValue '8192' -NoRestart

# Speed & Duplex
Get-NetAdapter | Where-Object { $_.InterfaceDescription -like 'VMXNET3*' } |`
 Set-NetAdapterAdvancedProperty -DisplayName 'Speed & Duplex' -DisplayValue '10 Gbps Full Duplex' -NoRestart

# Restart the VMXNET3
Get-NetAdapter | Where-Object { $_.InterfaceDescription -like 'VMXNET3*' } |`
 Restart-NetAdapter 

################################################
# To reset VMXNET3 settings to default 
################################################
Get-NetAdapter | Where-Object { $_.InterfaceDescription -like 'VMXNET3*' } |`
  Reset-NetAdapterAdvancedProperty -DisplayName '*'

  Reconfiguration of VMXNET3:

VMXNET3 Properties:


Windows Power Plan:


Conclusion: Applying best practices around VMXNET3 will definitely help to improve overall performance, but any performance issues related to the application will not be completely eliminated. The optimization efforts towards the application code will dramatically reduce network related performance problems, and hence the reduction of the waittype ASYNC_NETWORK_IO.

References and further reading:


Sunday, June 23, 2013

SQL Server Port - How to open in Windows Firewall

In the IT security world, it is said that approximately 80% of all security breaches occur by insiders; directly or indirectly, willingly or unwillingly. Here our focus is local Windows firewall and to see whether it is correctly configured or not. It is essential to make sure that every Windows and SQL Server is secured and protected.

Although SQL Server resides inside a DMZ, it is still important to secure the SQL box for anything unforeseen and there is no reason to disable the windows firewall. By opening a couple of TCP or UDP ports without disabling the Windows Firewall will guarantee maximum protection of a SQL Box. 

In the following steps, we will configure Windows Firewall for the default port 1433 to allow traffic to pass through in Windows 2012 for SQL Server 2012.

Step by step guide:
1.      In “Server Manager” select “Local Server”. (figure # 1)
2.      From the “Tool” menu select “Windows Firewall with Advanced Security”.
3.      Select the “Inbound Rules” from the left hand side. From the Action pane select “New Rule”. (figure # 2)
4.      On the rule type dialog box, select “Port” and click next. (figure # 3)
5.      Select “TCP” and enter 1433 in the “Specific Local Ports” box. (figure # 4)
6.      On the next dialog box, select “Allow the connection”. (figure # 5)
7.      On the profile dialog box, select all three options: “Domain”, “Private” and “Public”. (figure # 6)
8.      On the last dialog box provide a name, e.g. “SQL Server Database Engine” and description. Then click finish button. (figure # 7)
9.      On the “Windows Firewall with Advanced Security”, click “Enable rule”. (figure # 8)

Figure # 1: Windows Firewall configuration for SQL Server Port 1433

Figure # 2: Windows Firewall configuration for SQL Server Port 1433

Figure # 3: Windows Firewall configuration for SQL Server Port 1433

Figure # 4: Windows Firewall configuration for SQL Server Port 1433

Figure # 5: Windows Firewall configuration for SQL Server Port 1433

Figure # 6: Windows Firewall configuration for SQL Server Port 1433

Figure # 7: Windows Firewall configuration for SQL Server Port 1433

Figure # 8: Windows Firewall configuration for SQL Server Port 1433