Setting up a production-grade Kubernetes multi-node
cluster on a bare-metal server may be slightly tedious and daunting, however it
will strengthen your understanding of the various inner components of the Kubernetes
ecosystem. This step-by-step guide is for anyone who wants to dive deep into
Kubernetes architecture and containerization by creating a functional
Kubernetes cluster on a bare-metal or virtualized bare-metal environment.
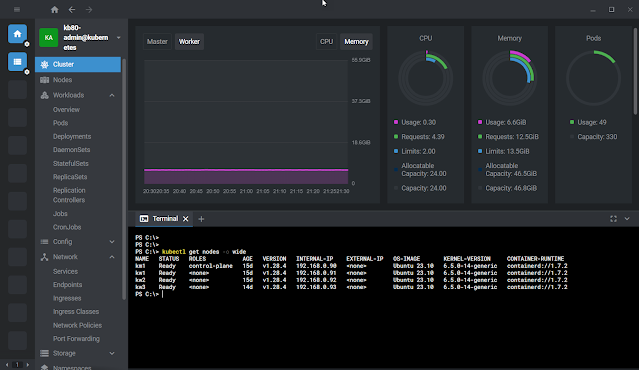 |
| Kubernetes cluster dashbord using OpenLens |
Our Kubernetes Cluster Nodes:
In this Kubernetes cluster setup, we will have one control plane (master node) and three worker nodes. All nodes are VM based Ubuntu 23.10 Server in VMWare vSphere and all nodes will have internet access. Following are the node information for this configuration.
|
Server |
Name |
FQDN |
IP |
Memory |
CPU |
Disk, Thin |
|
Control plane |
Km1 |
km1.home80.net |
192.168.0.90 |
8GB |
4 |
100GB |
|
Worker node 1 |
Kw1 |
kw1.home80.net |
192.168.0.91 |
16GB |
8 |
150GB |
|
Worker node 2 |
Kw2 |
Kw2.home80.net |
192.168.0.92 |
16GB |
8 |
150GB |
|
Worker node 3 |
Kw3 |
Kw3.home80.net |
192.168.0.93 |
16GB |
8 |
150GB |
Steps to create and configure Kubernetes cluster nodes:
- Install Ubuntu 22.04 or 23.10 Server on all nodes
- Basic Linux configuration for each Ubuntu Server
- Install and configure Kubernetes prerequisites on all nodes – this will be a repeated process for all Kubernetes master and worker nodes
- Create the Kubernetes cluster and then join each worker node to the cluster
Preparing an Ubuntu VM Template:
I’ll be using VMWare vSphere 8.0 to create each node. Steps are the following:
1. Download Ubuntu Server (22.04 or 23.10)2. Configure a VM in vSphere with following additional parameters
(a) Enable “Hardware virtualization” to “Expose hardware assisted virtualization to the guest OS”
(b) Add advanced option for VM configuration, disk.EnableUUID = TRUE
3. Install Ubuntu Server and then turn off the VM
4. In vSphere, create an Ubuntu Template (Template -> Convert to Template)
5. From the above template, create four VM named as km1, kw1, kw2 and kw3
The purpose of using a template instead of cloning is because each Kubernetes node requires unique MAC, Disk ID and Machine ID; and therefore, using a VMWare template in vSphere will make sure that each node gets unique hardware identification. If you use other than vSphere such as VMWare Workstation, Proxmox, VirtualBox, KVM, QEMU, etc., you need to make sure that the hardware identifications are unique for each VM.
Step#1: Configuring Linux machine for Kubernetes node (master and worker):
Following steps and method need to be applied to all nodes (km1, kw1,kw2,kw3), however, each node will have unique server name and IP address. All steps are performed as root user.
Power on the “km1”Logon or SSH to “km1”
Switch to root user: sudo -i
Perform all steps described below, and repeat the exact same steps for all nodes regardless of master or worker node.
Change or Adjust Kubernetes host name:
Unique hostname is required in Kubernetes, make sure that the node name is accurate.
Check hostname:
# hostnamectl
Change host name:
# hostnamectl set-hostname km1
Check and change hostname:
# nano /etc/hostname
Check and change hostname:
# nano /etc/hosts
Add all the Kubernetes participant nodes and IP to the /etc/hosts file. If you have a functional DNS in your network then this step is not required.
192.168.0.90 km1.home80.net km1
192.168.0.91 kw1.home80.net kw1
192.168.0.92 kw2.home80.net kw2
192.168.0.93 kw3.home80.net kw3
Check and change machine ID:
# hostnamectl
# rm -f /etc/machine-id /var/lib/dbus/machine-id
# dbus-uuidgen --ensure=/etc/machine-id
# dbus-uuidgen --ensure
# hostnamectl
SSH Connection:
SSH connection is preferable to perform all tasks, if SSH is not install, then install it:Update Ububtu repository:
# apt-get update
Install openssh server:
# apt-get install -y openssh-server
Enable ssh:
# systemctl enable ssh
Open firewall for ssh:
# ufw allow ssh
# ufw reload
Start ssh:
# systemctl start ssh
Check ssh status:
# systemctl status ssh
SSH root access:
For permanent access as “root” using SSH connection, do the following:
First backup the sshd_config file and then edit the file:
# cp /etc/ssh/sshd_config /etc/ssh/sshd_config.backup
# nano /etc/ssh/sshd_config
Add the following line in sshd_config:
PermitRootLogin yes
Enable and start ssh service:
# systemctl start ssh
# systemctl enable ssh
# systemctl status ssh
Adjust the network configuration file:
Edit the yaml file and change the IP.
# nano /etc/netplan/*.yaml
The network yaml file should be similar to the following.
# netplan try
# netplan apply
Step#2: Verify that all nodes have unique hostname, IP, MAC and Disk ID:
Check hostname and machine ID:# hostnamectl
MAC must be unique:
# ip link
Disk UUID must be unique:
# cat /sys/class/dmi/id/product_uuid
Step#3: Preparing Linux node for Kubernetes Cluster:
Following steps need to be performed on all nodes - master (control plane) and worker node. All steps are documented on Kubernetes official site. Before preparing Kubernetes node, it will be a good idea to check the official site for any changes or requirements that needs to be adjusted.
Enabling, configuring “overlay”, “br_netfilter”, bridged IPv4 and IPv6 traffic:
# cat <<EOF | sudo tee /etc/modules-load.d/k8s.conf
overlay
br_netfilter
EOF
# modprobe overlay
# modprobe br_netfilter
# cat <<EOF | sudo tee /etc/sysctl.d/k8s.conf
net.bridge.bridge-nf-call-iptables = 1
net.bridge.bridge-nf-call-ip6tables = 1
net.ipv4.ip_forward = 1
EOF
# sysctl --system
Verify above configuration:
# lsmod | grep br_netfilter
# lsmod | grep overlay
# sysctl net.bridge.bridge-nf-call-iptables net.bridge.bridge-nf-call-ip6tables net.ipv4.ip_forward
Install containerd. Note that we don't need to install docker:
# apt-get update
# apt-get -y install containerd
Prevent automatic update:
# apt-mark hold containerd
Configure containerd with defaults and restart with this config:
# mkdir -p /etc/containerd
# containerd config default | sudo tee /etc/containerd/config.toml
# sed -i 's/SystemdCgroup \= false/SystemdCgroup \= true/g' /etc/containerd/config.toml
Check and make sure that the value of SystemdCgroup = true:
# nano /etc/containerd/config.toml
Enable and restart containerd:
# systemctl enable containerd
# systemctl restart containerd
# systemctl status containerd
Installing kubelet, kubeadm and kubectl:
Before installing Kubernetes components, review the link for appropriate parameters. This installation is based on Kubernetes v1.28 whereas the newest version is v1.29.
Create the keyrings directory:
# mkdir -m 755 /etc/apt/keyrings
# apt-get update
# apt-get install -y apt-transport-https ca-certificates curl gpg
Choose any one Kubernetes version either v1.28 or v1.29 from below:
For Kubernetes v1.28:
# curl -fsSL https://pkgs.k8s.io/core:/stable:/v1.28/deb/Release.key | sudo gpg --dearmor -o /etc/apt/keyrings/kubernetes-apt-keyring.gpg
# echo 'deb [signed-by=/etc/apt/keyrings/kubernetes-apt-keyring.gpg] https://pkgs.k8s.io/core:/stable:/v1.28/deb/ /' | sudo tee /etc/apt/sources.list.d/kubernetes.list
For Kubernetes v1.29:
# curl -fsSL https://pkgs.k8s.io/core:/stable:/v1.29/deb/Release.key | sudo gpg --dearmor -o /etc/apt/keyrings/kubernetes-apt-keyring.gpg
# echo 'deb [signed-by=/etc/apt/keyrings/kubernetes-apt-keyring.gpg] https://pkgs.k8s.io/core:/stable:/v1.29/deb/ /' | sudo tee /etc/apt/sources.list.d/kubernetes.list
Finally install required Kubernetes components:
# apt-get update
# apt-get install -y kubelet kubeadm kubectl
# apt-mark hold kubelet kubeadm kubectl
# systemctl start kubelet
# systemctl enable kubelet
# systemctl status kubelet
Step#4: Firewall ports
for Kubernetes:
Either we can disable the firewall all together on all Kubernetes cluster nodes. Or we can open specific port for Kubernetes. Review the Kubernetes documentation for firewall port.
If you plan to disable firewall on Kubernetes node, then execute the following command on all nodes.
# ufw disable
If you plan to use firewall, then open the firewall ports as follows:
On Kubernetes master node (km1):
# ufw enable
# ufw allow 6443/tcp
# ufw allow 2379:2380/tcp
# ufw allow 10250/tcp
# ufw allow 10259/tcp
# ufw allow 10257/tcp
# ufw reload
# ufw status
Kubernetes worker nodes (kw1, kw2 and kw3):
# ufw enable
# ufw allow 10250/tcp
# ufw allow 30000:32767/tcp
# ufw reload
# ufw status
Step#5: Kubernetes Cluster creation:
All four nodes are now ready, we can proceed to initialize the Kubernetes cluster. On the control plane, in our case km1 (192.168.0.90), and perform cluster initilization.
# sysctl -p
Initialize the Kubernetes cluster with pod IP:
# kubeadm init --pod-network-cidr=10.244.0.0/16 --cri-socket unix:///run/containerd/containerd.sock
It takes a little while to complete and once it is complete, we will see onscreen output with instructions. At this point the Kubernetes control plane (master node) is ready. From the onscreen instructions apply the following commands for kube config on the master node:
mkdir -p $HOME/.kube
sudo cp -i /etc/kubernetes/admin.conf $HOME/.kube/config
sudo chown $(id -u):$(id -g) $HOME/.kube/config
Step#5: Installing a Container Network Interface (CNI):
There are several Container Network Interface (CNI) are available such as weavenet, flannel, calico and so on. We can choose any one of them, and in our setup, we will use flannel as for CNI:On the control plane (master) node (km1), execute the following command:
# kubectl apply -f https://raw.githubusercontent.com/flannel-io/flannel/master/Documentation/kube-flannel.yml
Step#6: Rename the Kubernetes cluster:
The default cluster name is “kubernetes”, we can change it with the following command:
Check the cluster name:
# kubectl config view
Command: sed -i s/[old-cluster-name]/[new-cluster-name]/ /etc/kubernetes/admin.conf && sed -i s/[old-cluster-name]/[new-cluster-name]/.kube/config
Change the default cluster name from “kubernetes” to “kb80”, execute the following command:
# sed -i s/kubernetes/kb80/ /etc/kubernetes/admin.conf && sed -i s/kubernetes/kb80/.kube/config
Verify the cluster name:
# kubectl config get-clusters
# kubectl config current-context
Step#7: Joining Worker
Node to Kubernetes Cluster:
As the master node is ready, now we need to include each work node to the control plane (master node) one by one. To do this, logon or ssh to the control plane km1, execute the following command. It will provide us a joining command. We need to copy this command and execute it on each worker node.
On the master node, execute the following command:
# kubeadm token create --print-join-command
 |
| Kubernetes worker node join command |
Copy the join command, and then logon to a worker node; paste and execute the joining command:
# kubeadm join 192.168.0.90:6443 --token vw73kk.yj0q6no2mdgk3jgi --discovery-token-ca-cert-hash sh a256:b6c79c87991cea792bc6def993a75b940a3673d070aeb8bef7b71ad267f240d1
Execute the same joining command on all remaining nodes.
Step#8: Verify Kubernetes Cluster is up and running:
Logon or ssh to the control plane and execute the following command on the master node:
# kubectl get nodes -o wide
 |
| Kubernetes cluster nodes and pods |
References:
Kubernetes Components:
https://kubernetes.io/docs/concepts/overview/components/
Installing kubeadm:
https://kubernetes.io/docs/setup/production-environment/tools/kubeadm/install-kubeadm/
Container Runtimes:
https://kubernetes.io/docs/setup/production-environment/container-runtimes/
Ports and protocols:
https://kubernetes.io/docs/reference/networking/ports-and-protocols/
https://github.com/flannel-io/flannel#deploying-flannel-manually
ReplyDeleteReally helpful explanation of kubernetes concepts! The examples and step-by-step guidance made it very easy to understand. This is a great resource for anyone wanting to build a good knowledge of kubernetes-tutorial. Keep sharing such informative content!.