A very common and misleading practice made by many is to accept the default value during installation or configuration. This practice may be acceptable or even suitable in some scenarios, but it may not be optimal for a targeted workload since the default values can eventually cause widespread performance issues.
While creating a Virtual Machine in vSphere ESXi, there are many mandatory values come as default for CPU, Memory, Network Card, Socket, I/O controller and so on that need to be decided on. The VMware architect sets most of the required hardware resources at the bare minimum values necessary to create a Virtual Machine regardless of the guest OS. Should we accept these defaults? Probably not. However, many administrators and associates continue to accept these bare minimum hardware default values without realizing the performance consequences.
Network Adaptor: Currently there are three types of Network Adaptors available and the E1000e is the default. E1000e is an emulated version of the “Intel 82574 Gigabit Ethernet NIC” and the guest OS will recognize it as “Intel(R) 82574L Gigabit Network Connection”. If this adaptor is selected for the guest OS (Windows, Linux), the required driver for this adaptor is already built-in within the OS and has no interaction with VMWare Tools driver.
A few disadvantages of E1000e:
1. It is not Paravirtualized, thus VM performance is not guaranteed.
2. Only supports basic network connectivity.
3. Does not support RSS (Receive Side Scaling).
4. Uses far more CPU on the hypervisor.
5. May cause memory leakage and high CPU on the guest OS.
6. Network packets drop.
VMXNET3: It is a Paravirtualized Network Adaptor developed by VMWare and it is recommended for VM to gain substantial performance benefit from the Virtual Machine. To take advantage of this adaptor, VMWare Tools need to be installed on the Virtual Machine.
Changing E1000e to VMXNET3: There are several ways to change the Network Adaptor type from E1000e to VMXNET3. Before doing this, you should record all network configurations from the existing network adaptor. If you would like to keep the MAC address of the of E1000e (existing network card), please write it down beforehand.
I found that using PowerCLI is the easiest and safest way to change the network adaptor type from E100e to VMXNET3.
Method 1: Using PowerCLI to change NIC type while preserving the original MAC address of E1000e:
· Note down the network configuration, including values such as IP, subnet, Gateway, DNS, etc. and take a snapshot of the VM.
· Turn off the VM.
· Connect to the Esxi Server, my Esxi server IP is 192.168.0.22:
Connect-VIServer -Server 192.168.0.22
· Check the Network Type:
Get-VM win01| get-networkadapter
· Change the NIC type from E1000e to VMXNET3:
get-vm win01 | Get-NetworkAdapter | set-networkadapter -type vmxnet3 -confirm:$false
· Turn on the VM.
· In a Windows VM, open the device manager (devmgmt.msc) and enable “Show hidden devices” under the view menu.
· Uninstall the “Intel(R) 82574L Gigabit Network Connection”.
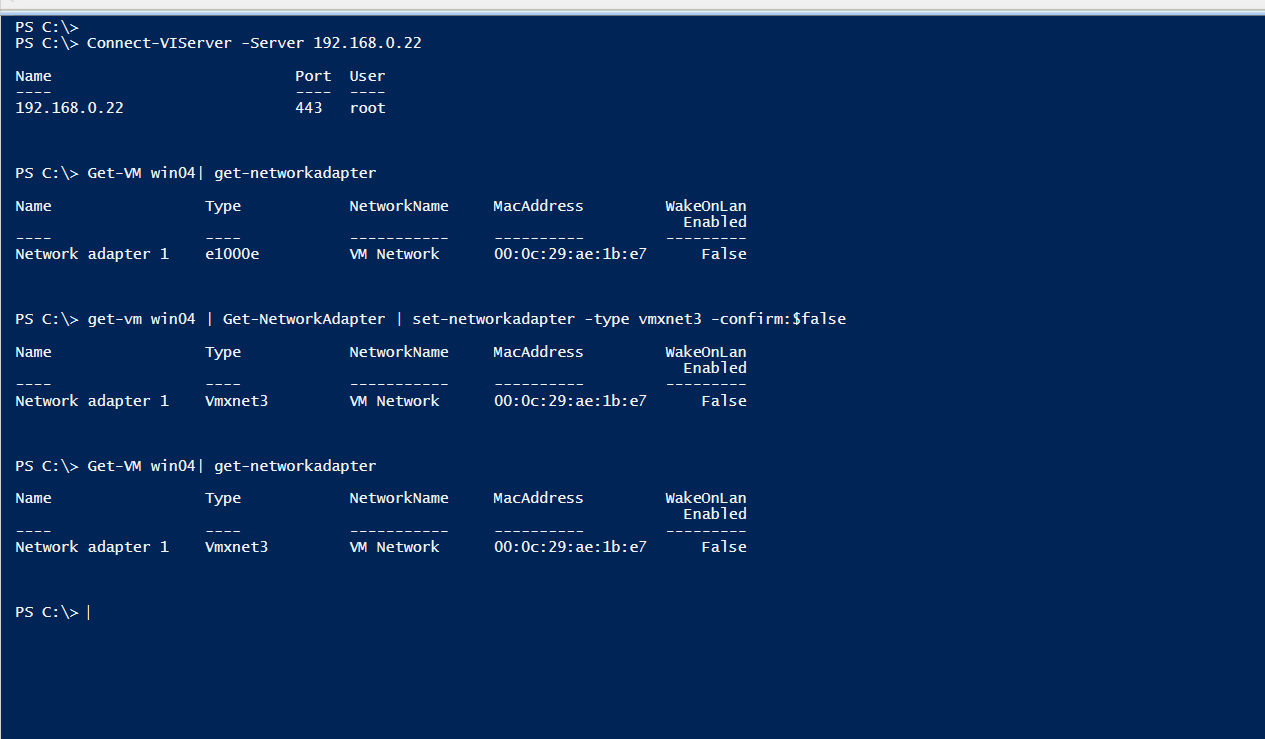 |
| Using PowerCLI to change Network Adaptor: |
Method 2: By editing the vmx file:
· Similar to above, note down the network configuration details.
· Take a snapshot of the VM.
· Turn off the VM.
· Open the datastore where the VM resides.
· Right click and download the vmx file to local desktop.
· Edit the vmx file and replace the adaptor type to vmxnext3 as follows:
ethernet0.virtualDev = "vmxnet3"
· Add the following:
ethernet0.CheckMACAddress = "FALSE"
· Save the vmx file, then upload the edited version and replace the original version.
· Turn on the VM.
· In a Windows VM, open the device manager (devmgmt.msc) and enable “Show hidden devices” under the view menu.
- Uninstall the “Intel(R) 82574L Gigabit Network
Connection”.
Reference:
Choosing a network adapter for your virtual machine (1001805):
https://kb.vmware.com/s/article/1001805
Understanding full virtualization, paravirtualization, and hardware assist:
https://www.vmware.com/content/dam/digitalmarketing/vmware/en/pdf/techpaper/VMware_paravirtualization.pdf
VMXNET3 vs E1000E and E1000:


